Thursday, June 11, 2009

Raised Garden Bed and Rock Wall

Sometimes, one project begets another. I like that, actually, because it keeps the creative juices flowing and presents its own sets of challenges. I had several problems to solve.


Problem 1: Overestimating material requirements. My pond project left me with a substantial pile (2 feet wide, 8 feet long, and 1 foot high) of leftover gravel and rocks (up to 4 inches in diameter). I needed a place to temporarily store this excess rock. (It was crowding our driveway, where we parked four cars.)

I decided the 30-inch wide bare earth strip between the south fence and the sport court could serve as a temporary storage area.


Problem 2: Too much mulch. I already had a large mulch pile that I'd moved close to the north side fence. I'd subsequently covered it over with garden soil and planted potatoes in it. I needed space for the gravel and rock, so I expanded the large mulch pile with excavated dirt from alongside the sport court.

I created a 3-foot tall 8-foot diameter green mound
where the worms could play and my potatoes could grow.

Problem 3: Bishop's weed (aka goutweed) takeover. Ev
er make a gardening mistake? I thought Bishop's weed was pretty--and because it was free, (came through a back fence) I'd allowed that weed to take over a 30-inch wide strip of bare earth next to our sport court. Only later, did I learn the name of the plant. Note: Be suspicious of anything with 'weed' as part of its name.

In the process of uprooting the Bishop's weed a year later, I harvested a couple of huge black plastic bags of the stuff. Don't even consider using it as mulch--takes too long to break down--put it in the trash! I dug deeply enough to completely remove all traces of its invasive roots.


I did move the excavated dirt from the 30-inch-wide strip over to the growing mulch pile and dumped my rock and gravel into the excavated strip beside the sport court. Temporary rock storage problem solved.


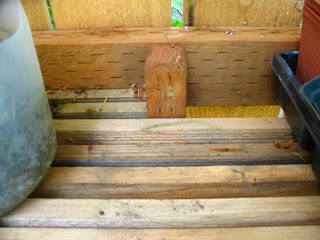
Rock and gravel is temporarily stored next to sport court (the dirt mound at bottom right was contributed by Mr. Mole)

A year later, I harvested the potatoes growing in the m
ulch pile, but the tall earth/mulch pile was an unsightly mound in winter. I needed to spread it around a bit. That's when I first contemplated a permanent raised bed.

Problem 4. Rotting fence boards. I knew I couldn't spread the
earth/mulch all the way to the fence, which was already rotting at the bottom from a long-term buildup of organic materials on both sides. I could solve that by purchasing new fence boards, but I had to consider how to protect the replacement fence.

My answer was both simple, economical, and involved the least labor for me: concrete building blocks.

I laid up two courses of concrete building blocks as the back wall of the new raised bed. Concrete blocks aren't pretty. However, my back-of-the-raised-bed block wall is mostly hidden from view by both the dirt in the bed and the plantings growing in the raised bed. The back-of-the-raised-bed wall is fairly close to the wooden fence, but there's still plenty of space for good air circulation at the bottom.


Concrete blocks help keep dirt in the bed and away from fence. Note air gap between fence and blocks.

I had a few large rocks leftover from the pond project and used them to start the front-of-the-raised-bed wall. My block back wall is 12 inches tall and the rock front wall is just slightly shorter.

Completed rock wall with gravel path in front.

Bug's eye view of wall and gravel path.

Problem 5: Digger dog. Our dog likes to dig (surprise, surprise). My son pointed out to me (the day after my rock wall was up) that Cookie dog had dislodged the rocks in a section of the wall. She'd dug in front of and beneath the wall rocks and undermined them. (Seems she was after an invader--a mole.)

To prevent her undermining my rock wall again, I laid down a pathway of compacted gravel in front of the new rock wall. This won't stop her from digging within the raised bed, of course, but my new rock wall is reasonably safe.

Problem 6: Mole. Since Mr. Mole travels from my yard to the neighbors yard and back, it isn't a serious problem for the moment. I'll probably have to trap it (...squish...).

Wishing Well (part 1)

A Look at the Space Between the Raised Bed and the Wood Fence.

A portion of the front of the rock wall.

End of the Rock Wall and Start of the Wishing Well.

A Peek Inside the 'Dry' Wishing Well.


Why build a wishing well? I've been asked that by several family members. I don't have a really good answer, it's just that I want to build one, I have the space for one, and I'm enchanted by the sight of them (especially since visiting Colonial Williamsburg in 1999).

There is a sense of mystery with wishing wells. Seeing one, I ask myself, is there water? Is it potable water? What's it taste like? How deep is it? I want to look inside. And, if no one is looking, maybe drop a marble or a pebble inside and count the seconds till I hear a 'plop?'

Mystery and wonder is WHY I wanted to build a backyard well. Not a real one. No hole in the ground. I only wanted to simulate a wishing well. I found plans at Buildeazy for a wooden wishing well, but it didn't appear as large, or as subtantial, or as 'real looking' as I'd like. I did like their plans for a wood bucket and windlass though (crank for bringing up the bucket and rope), and I may eventually build a similar one.

I used concrete building block material because: it is cheap, substantial, easy to use, won't blow over in a wind, and it fit in with my plan for a raised garden bed. It took three trips to The Home Depot with my Ford Explorer to bring all the needed blocks home (for the raised bed and the wishing well).

Monday, June 8, 2009

Garden Accessory Projects (part 3)

FENCE-MOUNTED PLANT CONTAINER SHELVING.

This plant container shelf system uses the strength of the fence (including fence rails and fence posts) to support gallon-sized plant containers. It has several advantages. This system foils our Northwest slugs who cannot find their way up to the plant shelving. This system does not use up any precious ground planting space. And the container plants get plenty of air circulation, thus promoting healthy living conditions.

First, I assume that all fence rails have been installed vertically (that is, the nominal 4 inch portion of the 2 by 4 rail is mounted vertically), using fence clips to attach them to the fence posts. Otherwise, you'll have to adapt to your current fence system.

The "support system" consists of several wood Rail Supports (minimum spacing of the rail supports is 3 feet apart). The Rail Supports in turn support the Shelf Brackets. The length of each rail support is determined by the spacing between the existing fence rails. Each Rail Support is notched to fit over the fence rails and end up being flush with the fence boards. The Rail Supports are fastened to the fence rails with 3-inch decking screws.

The shelf Support Brackets are scrap pieces of 2 by 4 cut to the width of the desired shelving. These are fastened to the Rail Supports with decking screws.

The "shelves" are lengths of lath loosely resting on the Support Brackets. The weight of the plant containers holds the lath strips in place. You could also use a couple of 1 by 4's, or 2 by 4's for the shelves. The Support Brackets will hold a lot of weight, so use 2 by 4's or larger stock.


Sketch of a fence 'rail support' and 'shelf bracket' to hold plant containers


The completed fence plant container shelving.


Mounting detail (a Support Bracket is mounted to a rail support)


Mounting Detail (the Support Bracket on the right is screwed to a fence post)


Rail Support board is notched and screwed to fence rails (top and bottom)


HYPERTUFA ITEMS.

I read a book about creating items from hypertufa and decided to try my hand using this medium. I first made a hypertufa planting trough using a cheapo styrofoam cooler for my mold. (The cooler wasn't being used because the lid got crushed. I like to recycle quasi-useful stuff.) I also had some left-over galvanized hardware cloth (1/2-inch by 1/2-inch spacings) that I used as reinforcement. Before applying the 'tufa' mixture to the upside down cooler, I punched two large drainage holes in the styrofoam bottom and made sure there were holes in the hardware cloth at those points. The main advantage of hypertufa is it is comparatively light weight, so moving the completed items is relatively easy. The disadvantages of using hypertufa is the LONG drying time. It will be several days until you can move the project, and a week before you can use it for its intended purpose. You'll also need a pair of tin snips to cut the hardware cloth and gloves for mixing and applying the hypertufa mix. I used wire to hold the metal cloth together in the curves and cut areas. You can use bottle caps to act as spacers between the hardware cloth and the syrofoam ice chest or anything else you may have handy. Just be sure the hardware cloth doesn't show through and that the tufa contacts the styrofoam inside the metal wires. The drawing below shows the process.


Components to create a Hypertufa Trough


Completed Hypertufa Trough with plants.

The photo shows the completed item (one year later). I used the left-over mix to make peek-a-boo 'critter' faces that are placed elsewhere in the garden.

Garden Hypertufa 'critter' with large marble 'eyes'